Monday, April 27, 2009

My latest favorite color

daidai mini
The Japanese language has made words for the subtle difference in the red spectrum. Recently I learned a new color "daidai", this color is for a warm saturated orange color. The word “daidai” is actually the name of a citrus fruit. This orange is quite sour and is generally used more for decoration than for its juice. For those familiar with the Japanese New Year celebration, you might recall the daidai orange as the crowning touch on a stack of round mochi cakes.
The other day I received a bag full of these “daidai” oranges. Upon recommendation I used them to squeeze on freshly boiled seaweed, and also as a salad dressing.
On the Amakusa islands, many varieties of citrus grow in abundance. The taste, shape and color variations all make for non-stop delights for my taste buds. The only problem with a lot of these varieties is the over abundant use of chemical fertilizers and pesticides. These chemicals all wash into the rivers and eventually the sea leaving an environmental disaster.
The daidai variety is actually a type that does not require any special care. Although these varieties are not prized for their taste, and as such do not fetch a dear price at the markets, the fact that they are a sustainable crop should increase their value.

Tuesday, April 21, 2009

Kanreki Journal Cover

happy b-day johnny
In Japan, turning sixty is a big occasion known as “kanreki”.“Kanreki” is a big event in Asia for people who have completed 5 revolutions of the Chinese Zodiac calendar. In Japan, this monumental event is celebrated by giving the honored person anything in the color red.

In celebration of my boss turning sixty, I decided to make him an agenda book using the colors red. I used various scraps from red and black traditional kimono material. I tried to make the book cover simple, functional yet something that my boss could carry around without feeling embarrassed.

I used a quilting pattern called “Drunkards Path”. This pattern can be put together in various different forms to make many different shapes, but for this project I decided to make simple circles. When using antique kimono material I found it beneficial to first fuse on some thin material, which then made the material more stable and easier to sew.

The book cover was then put together with some plain black cotton material. For some reason I didn’t really like putting the silk material of the antique kimonos together with a basic cotton material. In accordance with my quilting teachers guidance I used this material. In retrospect, although this material is very strong and simple to quilt, perhaps a coarser material such as linen or hemp would have matched my vision and the rugged use that my boss needed for his journal cover. What do you think?

It’s been over a year since I made this project, and I’m happy to report that my boss still uses this book cover. That is really the best compliment you can give a quilter, isn’t it!
happy b-day johnny inside

Monday, April 6, 2009

Coin Quilt

These days my life has become closely intertwined with the Internet. For sewing ideas and inspirations I love to look at people's blogs and flicker photos. Recently in cyberspace, coin quilts seem to be all the rage. Using a handy tutorial by Moda Fabrics and some inspiration from a Coin quilt flicker group, I started on my latest creation.
This easy to make quilt is basic but quite attractive using up odd and end scraps of material. I used mainly various scraps from material designed by Anna Maria Horner. With my recent purchase of a sewing machine, I was looking for a project that I could do with my new acquisition. This quilt with its straight sewing lines seems like the perfect project.

After cutting tons of rectangles of scrap material with my rotary cutter, I spread them out on the floor of our living room arranging them first by color, then finally settling on a gradation of color, starting with darker red colors on the bottom gradually changing to light greens on top. Since I used brightly patterned material for my coins, I found that alternating colored material with white material made the quilt look less busy.

Next I pieced it all together using my new sewing machine, chain stitching heaps of pairs of colored material and white material. I then sewed these coupled fabrics into groups of 4, then groups of 8 etc. Before I knew it I was done, quick and simple. Next I chose a pretty, soft pink material by Moda for the borders and the backing. After I attached the borders, I was ready to put the quilt together. Using a process that I found on the net (crazymomquilts), I taped down my backing material to the floor, layered on my batting and finally my completed top layer. Instead of pining it all together, I hand basted through all the layers, starting in the middle and working my way out in a grid. This took forever and killed my back, but alas if you want your end product to lie straight and beautifully this is a crucial step.

Now that my sandwiched quilt was ready to be quilted, I turned to my sewing teacher, for advice. We agreed on using a combination of both sewing machine and hand quilting to finish the quilt. I'm interested in learning how to use a frame to hand quilt, so I figured this quilt would be as good a time as ever to learn this technique. Since the quilt has large areas of plain white material, I decided on some intricate hand stitching using a technique known as trapunto. So far, I've chosen the pattern, and begun the long process of hand sewing. After about 10 hours of using a frame and two thimbles to hand quilt my creation, I'm finally getting faster and my stitches are getting more regular, even and shorter. Perhaps I should have practiced this new skill first on a scrap quilt. As it is, my quilt in the end will be a little irregular, changing slightly as my workmanship improved. I'm hoping by the end of this quilt, I will have mastered this technique!

coin quilt on hoop

Wednesday, April 1, 2009

Messenger Bag

computer bag close
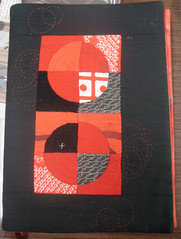
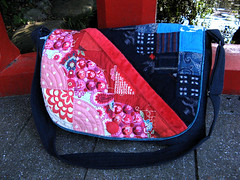
My first big sewing project was a shoulder/messenger style bag. Rik, my husband, helped me with the design of this bag, combining functionality with style. For me, it’s all about the colors and patterns, for Rik, it’s all about making something that is useful and serves a purpose. Since this bag was to be used during my commutes to work by bicycle, Rik thought that it was important to make the cover of the bag in a pattern similar to a road sign, something that is easy to see from far away. We decided on a diagonal design using a gradation of bright reds to white on one side, and a gradation of dark colors to light colors on the other. With the sudden switch from bright red to dark blue, this effectively created a design that would stand out from far away.

The choice of material was left to me. I love a variety of materials. This time, I used a red stripe of soft and furry Minky as the centerpiece. On the red half, I used some material by Amy Butler, some Japanese silk kimono materials, and others. These were all hand pieced together in a pattern known as Drunkard's Path, a tricky piecing technique that consists of mostly curves sewn together. The blue side of the bag was made almost entirely with antique “kasuri”, a Japanese material that was used to make everyday kimonos in the past. The “kasuri” I used was made of wool, although often “kasuri” is cotton.

After the piecework was finished, I basted the creation to some batting and used a scrap piece of material for the backside. I now hand quilted all the various lines. After I finished this, it was time for the really tricky part – putting the bag together into a functional shape.

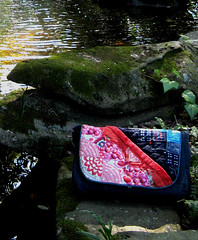
Using my second hand sewing machine, somehow I managed to put things together into a bag like shape, although I was left slightly unsatisfied with the result. The size was right, but the front panel was too big and bulky and difficult to open and close in a jiffy. If I were to make it again, I would make it with the opening at the top. This would be more convenient, plus the front design would be better positioned.

computer bag
Throughout the process of making this bag, I had the invaluable advice of my sewing teacher. Although she was baffled by my combination of materials and colors, she was able to help me put the whole thing together. In Japan, “kasuri” is generally material favored by the elderly. I think young people look at “kasuri” and immediately think of their grandmothers. For me, a “gaijin” or foreigner living in Japan, I have none of these preconceptions about the material. I love the indigo color which comes from a natural dye, as well as the simple weaves and patterns of the fabric.

Initially I made this bag with the intention of using it for transporting my laptop computer. Although I occasionally use it for this purpose, generally, I simply use it as my work bag. It is roomy enough for carrying my lunch, some books and the other junk that seems to collect in people’s bags.

Some of my friends have remarked that I could have sold this creation. Considering all the time and effort that went in to making this bag, I can’t imagine an appropriate price. One of my junior high school students complimented me by saying that she would even pay $50 for it. I sighed and wondered about the futility of living in a world where handmade products are so undervalued. After all in Japan, as in most of the developed world, almost everything is made in China, where labor is cheap, working conditions are abominable, standards are low and production is high. In this present economic situation making things by hand does not seem to make any sense. Still, I think there is a point to it. Rik also thinks it is great to learn new skills and to exercise ones creative mind. After all, we just can’t attach a price to everything.
comp
Site Meter